Genetic Job Change Quest

Wednesday, December 1, 2010


Requirements:

Base Level: 99

Job Level: 50 for Alchemist, 60 for Biochemist

Reward Item: 1 Midas Whisper[1], 1 Green Apple Ring

1. Go to the Alchemist Guild in Al De Baran and find the Alchemist Union Member on the first floor (alde_alche 35,185).

2. When you tell him you have interest in Geneticists he asks you to find an experct called Devries in Lighthalzen.

3. Go to the Geneticists Lab in Lighthalzen. It's located on the west side of Lighthalzen.

4. Inside, talk with Devries (job3_gen01 25,58)

5. Devries starts talking about Geneticists but the conversation gets distrubed. He tells you he can't concentrate, but that he likes the cookies he had at home in Rune-Midgard.

6. Go upstairs to Devries' room and find the Delivery Box (job3_gen01 81,72). Open the box and take a cookie from it. Please note that the cookie will NOT show up in your inventory.

7. Talk to Devries again and hand him the cookie. He will confirm whether or not you want to continue. Talk 2 more times with Devries untill he asks you to conduct an experiment with plants.

8. Go to the cabinet south of Devries and read the Plant Guide. You need to read at least the option 'Plant' in order to continue

9. On the first floor you'll find several plants.

10. Acquire all of the following 6 plants:

* Sticky Grass
* Muka Tree
* Bigibigigrass
* Bogi Vine
* Congra
* Aolatura

11. When you get all plants to do the table and start the experiment.

12. You need to do it in the following order. The names for each option may differ at random, thus you might have to repeat this sequence if unsuccessful.

*1. Crush
*2. Heat
*3. Put it into a Testing Flask and Shake
*4. Dip in distilled Water
*5. Inject it into a Testing Seed

13. You will be ask which kind of Testing Seed you want to use, but you can select any option you'd like. When you're done, you will get a Seed For Experiment.

14. Go to Devries again and talk with him. He'll tell you he will recommend you with the Alchemist Union Member, but since it takes time he requests you go see Demi Calberine.

15. You'll find Demi Calberine (job3_gen01 91,48) on the second floor. She tells you she's trying to make a new cart but that some parts are missing.

16. Check out the Organized Parts spread on second floor. When you talked to all of them, talk to Demi Calberine again.

17. Demi Calberine will now ask you to test out Cart Revolution on Poison Spores. You will be teleported into the Poison Spore holding pen at the first floor.

18. You'll have to kill 100 Poison Spores, which keep respawning a few seconds after you've killed them.

* Notes:
* You can leave the pen at any time you like by talking with the sign outside the cage.
* If you die or exit the pen, you can talk with Demi Calberine again to enter the cage.
* Killing any Poison Spore in any other part the game not will allow you to complete this part of the quest.
* Although it's implied you need Cart Revolution, you do not actually need to to proceed. However, due to the amount of Poison Spores in the cage it would be considerably faster to have acquired Cart Revolution before starting this part of the quest.

19. After killing 100 Poison Spores, talk with the sign outside the pen.

20. After you've left the cage, talk with Devries again. He'll tell you no reponse has arrived yet. Please note that you need to remove your Cart in order to continue from this point.

21. Talk with Devries again and he'll promote you to Genetic.


Source: IRo Wiki

Sorcerer Job Change Quest


Requirements:

Base Level: 99

Job Level: 50 for Sage, 60 for Scholar

Reward Item: 1 Wind Whisper[1], 1 Green Apple Ring

1. On the top floor of geffen tower, speak to Merito. When he asks what brought you here, pick any option (except the last). When has asks your name tell him.

2. Speak to him a second time, tell him you can handle magic skillfully. Then tell him that Sorcerers can deal with the spirits. Agree to his test and he'll tell you to go to Karacas on the 4th floor.

3. Go down three floors and speak to Karacas (gef_tower 113, 161) in the middle of the room. He says you will need 3 Wind of Verdure, 3 Crystal Blue, 3 Red Blood, and 3 Green Live for the next step.

4. Karacas then gives you locations where you can meet the spirits.

5. You must collect 3 reagents from the 4 locations (one from each location). For each attempt to communicate you will need 3 of the corresponding elemental stone. You will likely need at least 100 elemental stones.
*1. Ice Dungeon 1: Use Crystal Blues at the northeast corner (ice_dun01 274, 274)
*2. Thor Volcano 1: Use Red Bloods at the center of northwest room (thor_v01 64, 252)
*3. Mjolnir Dead Pit 3: Use Green Lives at the southwest part of northeast island (mjo_dun03 201, 141)
*4. Kunlun Dungeon 2: Use Wind of Verdure at the southwest part of northeast island (gun_dun02 195, 190)

6. Once you have a Clear Reagent, Black Reagent, and Red Reagent, return to Karacas.

7. Karacas will congratulate you on finishing the test and change you to a Sorcerer.

Source: Iro Wiki

Wanderer Job Change Quest


Requirements:

Base Level: 99

Job Level: 50 for Dancer, 60 for Gypsy

Reward Item: 1 Dying Swan[1], 1 Green Apple Ring

1. In Lutie, speak to the either of the Aspiring Wanderers (xmas 161, 209) south of santa's house.

2. On the west side of the Christmas tree (in south lutie), speak to the Performance Manager (lutie 132, 143), offer to help him. He asks you to speak with Song Guitar in comodo regarding the canceled performance.

3. In Comodo, go into the casino, up to the next floor, and south through a portal. You should end up on a balcony with a Cheerless Minstrel (comodo 139, 86).

4. Talk to him and inquire about Dancer Kim, use Kiss of Fortune (Lady Luck) to make him talk. He tells you Kim quit the group and is in hugel.
* Note: If you have not learned Lady Luck, selecting "Scream" has a low chance to advance the quest.

5. In Hugel, enter the building just west of the airship (hugel 153, 149). In the east room talk to Vacant Looking Lady and tell her she shouldn't give up. Offer to exercise with her and she'll ask you to meet her at abyss lake.

6. At the east portal of abyss lake (hu_fild05 342, 130), speak to Dancer Kim. She will give you a kill count quest for 50 Yellow Novus, with a 10 min timer.

7. After you succeed, she asks you to tell Guitar Song in comodo that the performance is back on.

8. After telling him in comodo, proceed to lutie.

9. Walk near the front of the tree and the show will begin. Click on Dancer Kim, and after some dialog you will be changed to wanderer.

Source: IRo Wiki

Ministrel Job Change Quest


Requirements:

Base Level: 99

Job Level: 50 for Bard, 60 for Clown

Reward Item: 1 Minstrel Song Hat[1], 1 Green Apple Ring

1. Immediately south of the boat in Alberta, speak to the Bard (alberta 196, 133). Offer to help him find 'Minstrel Song'. He says to look around Prontera.

2. Go to Prontera and speak to the Warmhearted Woman (prontera 141,97) near the center Kafra. She sends you to talk to someone near Prontera Castle.

3. Just west of Prontera Castle, speak to Glasses-wearing Man (prontera 140, 331). He will tell you to speak to the woman in front of the tool shop.

4. In front of the tool shop speak with Woman (prontera 146, 218). She doesn't offer much help. Return to Alberta.

5. Speak to the bard again, he has learned that 'Minstrel Song' headed to Hugel many years ago. Since the sea route is no longer in service, you'll have to take the Airship.

6. Head to the Juno-Hugel (Domestic) Airship.

7. Speak with the bard in the northwest corner (airship 222,67). You will automatically be warped to an inn in Hugel. Speak to the bard again and he will suggest visiting the pub.

8. In southeast Hugel, enter the pub (hugel 127, 65).

9. In the first room inside the pub, speak to the Tone-deaf Person.

10. After listening to the Tone-deaf Person's song, return to the inn and speak to Karian. After telling him that 'Minstrel Song' headed for Thanatos Tower, Karian decides you will both go there too.

11. Walk near the portal to enter Thanatos Tower (tha_scene01 140, 199), and you will find a piece of paper on the ground. Head to Juno.

12. On the west side of the main Juno quad, speak to Mr. Click (yuno 143, 170). You will recieve a photo of 'Minstrel Song'. On the back of the photo it says you need to hunt 33 teddy bears.
* Go kill 33 Teddy Bears. (ein_fild03 is the best place to do this. From Lighthalzen, go north, east, then north.)

13. In front of Lighthalzen Hotel, speak to the little girl. She says 'Minstrel Song' was headed for the Ice Cave, so head to Ice Dungeon.

14. As soon as you enter Ice Dungeon 01, you will start to explore the map and find a poem written on the wall. (a series of NPC's will teleport you from 1 spot to the next as you read each line).
* Note: This may not work if there is another player sitting at the entrance to Ice Dungeon.

15. When you wake up, speak to the Old woman. She tells you 'Minstrel Song' went to comodo after he carved the poem in the wall of the Ice Dungeon. Since Karian is afraid of airships, you will need to get to Comodo via the south veins dock.

16. Talk to the sign, take the kayak, and when prompted, "Throw the water out" of the boat.

17. Once you arrive in Comodo, head north and talk to the Kayak Master he suggests asking the hostess at the diner.

18. Head to the north end of Comodo and speak to the Woman Roasing Meat (comodo 159, 318). She tells you 'Minstrel Song' headed somewhere quiet southeast of Morroc. Head to the Assassin Guild.

19. As you walk up the steps towards the Assassin Guild (moc_fild16 205, 231), you'll find a sheet of paper buried in the sand. Karian says to visit the clock tower, so head to Aldebaran.

20. As you approach the Clock Tower in Aldebaran, Karian appears and sings you a song his friend used to sing. Afterwards, he suggests returning to Prontera.

21. Near the south Prontera Kafra (prontera 157, 39), Karian will speak with you again. Approach him and speak to him. You will be warped to a small room.

22. Speak to Karian again inside the room, and he will reveal that he is 'Minstrel Song' and job change you to Ministrel.

Source: IRo Wiki

Royal Guard Job Change Quest


Requirements:

Base Level: 99

Job Level: 50 for Crusader, 60 for Paladin

Item: 100 Burning Hearts

Reward Item: 1 Dip Schmidt Helm[1], 1 Green Apple Ring

1. In the crusader area of Prontera castle, speak with Middle-aged Gentleman (prt_castle 48, 161). He will tell you about Schmidtz's trace.

2. Speak to him again, when he asks what is key to being a Royal Guard, select any option.

3. To show your endurance, bring back 100 Burning Hearts.

4. After returning with the hearts, listen to his story.

5. He tells you the last missing trace of King Schmidtz is in Glast Heim Monastery.

6. Head to Glast Heim Abbey and walk straight forward to (gl_church 156, 102). A popup dialogue will tell you that you feel a strong power.

7. Numerous spots will be marked on your minimap, at each spot, check the Delicate trace until you find A Saint's Clothing Piece.

8. Return to Prontera Castle and speak to the Middle-aged Gentleman again. He will take the Cloth and give you a King's Shield.

9. There is some strange writing on the back of the shield, check your quest window to read it.

10. Proceed to Glast Heim, at the north end of the right side of the moat around the castle, click on the Memory of King Schmidtz (glast_01 240, 367) near the tree.

Source: Iro Wiki

Shura Job Change Quest


Requirements:

Base Level: 99

Job Level: 50 for Monk, 60 Champion

Reward Item: 1 Blazing Soul[1], 1 Green Apple Ring

1. In Veins, go into the Pub (veins 149, 218) and talk to Sludge Worm (ve_in 241, 128).

2. He and a waitress get into an argument, and an unknown fighter breaks it up.

3. Go back outside and up the ramp to the upstairs building (veins 128, 237) and talk to the fighter down the stairs (NPC window will pop up). The fighter is reluctant to talk to you. Continue talking to her until she tells you to kill 100 Desert Wolves.

4. Return after killing the wolves, and she tells you to talk to Buddy who is training on the El Mes Plateau southeast of Juno.

5. Talk to Buddy in the center of Juno Field 7 (yuno_fild07 254, 176) who warps you to the test area.

6. Enter the chatroom (there may be a wait if someone is ahead of you).

7. Upon entering the test room, a large mob of Incubus, Rybios, Skeleton Prisoners and Zombie Prisoners will spawn. Another wave will spawn later, followed by a mob of Rideword "Magazines." Finally, another mob of Incubus, Rybios, etc. will spawn. The monsters do not have to be killed.
* Tip: Hide behind the top pillar and kill monsters that find their way to you (with the flags in front of it, pictured). It is recommended to have Mental Strength as a backup for when the mob attacking you becomes too large to pot through.

8. After surviving the onslaught, Buddy returns, the surviving monsters are killed and he takes you to his Master.

9. Talk to the Master, who accepts you as a Sura and changes your job.

Source: International Ragnarok Community

Guillotine Cross Job Change Quest

Tuesday, November 30, 2010


Requirements:

Base Level: 99

Job Level: 50 for Assassin, 60 Assassin Cross

Reward Item: 1 Green Apple Ring, 1 Jewelry Box, and 1 Silent Executioner

1. Visit the pub in Morroc (morroc 45, 107).

2. Talk to the Guild Member.

3. Go to Veins, and visit the Guillotine Cross Assassin Guild headquarters (veins 254, 255).

4. Talk to Daora inside the Guillotine Cross Assassin Guild headquaters.

5. Go through the portal at the bottom right of the room, and proceed to enter the left portal in the next room.

6. Talk to Mayshell.


7. Go back into the main part of the guild headquaters and talk to Daora again. Keep asking for a drink until you are given the option to ask for help.

8. Talk to the Vigilante (veins 291, 214).

9. Go to the Tool Shop at (veins 230, 162) and talk to the Young Merchant inside.

10. Go to the Bar in Veins (veins 148, 216), and talk to the waitress inside, Waitress Madelle.


11. Go to (veins 184, 142) and talk to the Peddler.

12. Go to (veins 231, 125) and talk the Old Man.

13. Go to (veins 226, 180) and talk to the Girl. Pick the following characteristics: Girl, yellowish hair, young.

14. Go back to the Assassin Guild in Veins and talk to Daora. Request a drink and she will talk to you about the blind alleys in town.

15. Go to (veins 341, 286) at the time specified in your quest log (1 hour later) and trigger the NPC by walking around the area. You have the chance to fail at catching her; you will have to wait another 10 minutes to try again if this happens. (Approaching from below while cloaked may have a higher success rate. Do not uncloak during the dialogue, it will end and this will register as a failure.)

16. Return to Daora and ask for a drink to start another dialogue.

17. Go into the portal to the right, and enter the right portal in the corridor. Then talk to the NPC behind the desk (Estillda).

18. Go to (veins 206, 55) at the time specified in your quest log (3 hours later) and trigger an NPC dialogue.

19. You will now be warped into a room with an NPC. Talk to the NPC and he will attack you. After you kill him, click on the corpse to receive a key. Click on it again to be warped back to Veins.

* NOTE: The NPC monster has a lot of HP but seems to have low hit and doesn't hit for much damage. Just keep attacking and he will eventually die with little fuss. Also if you happen to disconnect within the room at any point in time, don't panic. You won't have to wait another 3 hours to fight him again. Just spam the pop-up window at the entrance of the building till it lets you enter once again.

20. Go to Rachel and talk to Girke (rachel 115, 76).

21. Go to (rachel 61, 37) and enter the building. Talk to Oresa Rava.

22. Return to Mayshell at the guild in Veins.

* NOTE: There will be two possible GX NPC Locations, both are confirmed and listed below. Depending on what the quest window tells you after speaking to Mayshell, you will go to 1 of the 2 listed locations.

23. Option 1: Go to Veins Field 5 and talk to the Girl (ve_fild05 328, 308), she will warp you to a new map. You will have 10 minutes to finish this mission.

24. Option 2: Go to Veins Field 2 directly south of Rachel and talk to the Girl (ve_fild02 330, 384), she will warp you to a new map. You will have 10 minutes to finish this mission.

25. Find a gap near the top of the fence to get through (it appears as a shadow on the ground; click it and choose to crawl through; you must be standing beside it for the dialogue to pop up). Cloak so the guards can't see you and move around to the back of the building. The guard dogs are demon type and can see through cloak, so be cautious.

26. Enter through the back door.

27. Talk to the NPC inside the building, who will attack you after a dialogue.
* NOTE: Be prepared as he has a lot of HP and the guard dogs may wander in during the fight. You may want to drag him up or down to one of the rooms. Bring a good supply of potions as he hits for over 1000 HP. The NPC monster is Large size, Demon race, and is Undead element.

28. Once the monster is dead go back out the back door and talk to the NPC to the right and she will warp you back to the guild in Veins.
* NOTE: If you took longer than 10 minutes, she will warp you back to her location on the field map and you will have to do the mission over again. If you die within the mansion as well, you will have to wait for the 10 minute timer to expire before you can re-enter. The GX NPC will mention "it is better to strike when it is darker" etc. etc., indicating that you may not re-enter until 10 min. cool-down is over. There is also a similar 'wait' period for this section of the quest, as only one player may enter at any given time. Other players must wait till the previous tester is finished prior to allowed entrance by the Female GX NPC.

29. Go into the room to the north and talk to Mayshell.

30. You will be given a grade by Mayshell based on how well you accomplished your quests (i.e. How many times did you have to ask about what to do or how many times did you question Daora, and how many times you died during NPC battles). Grades range from A-F and are essentially cosmetic. Any grade lower than a C will not receive a Jewelry Box award.

31. Go back out of this room and into the room on the right. In this room talk to Bercasell and tell him you want to be a Guillotine Cross. He will tell a story about the Guillotine Cross job and then change you to a Guillotine Cross.


Source: IRo Wiki
Mechanic Job Change Quest


Requirements:

Base Level: 99

Job Level: 50 for Blacksmith, 60 for Mastersmith

Reward Item: 1 Green Apple Ring and 1 Driver Band[1]

1. Talk with Chainheart in Juno at (129, 156).

2. Talk with him again.

Source: IRo Wiki

3. Talk with him yet again, then choose the option 'I want to know more'.

4. Go to the Juperos Ruins.

5. Talk with the scholar outside the entrance to the Juperos Ruins (jupe_cave (37, 55)), and accept his offer to teleport you to the core.

Tip: You can avoid fighting the dimiks in this area by equipping a garment with a Frilldora Card compounded to it and using Cloaking.

6. Talk with the ghostfire at (149, 273) and listen to its story.

7. Travel counter-clockwise to talk with the ghostfire in the south-west at (53, 75).

8. Continue travelling anti-clockwise to talk with the ghostfire in the south-east at (242, 62).

9. Stand on the switch in the west at (29, 150).

10. Stand on the switch in the east at (272, 149).

11. Examine the southmost part of the statue at (288, 142).

12. Stand on the switch in the south at (150, 33).

13. Talk with the ghostfire in the north again, who teleports you back to Juno after the conversation.

14. Talk with Chainheart again, who makes you a Mechanic and awards you a Driver Band [1] and Green Apple Ring.

Source: IRo Wiki

Warlock Job Change Quest


Requirements:

Base Level: 99

Job Level: 50 for wizard, 60 for high wizard

Reward Item: 1 Green Apple Ring and 1 Magic Stone Hat [1]

1. In Morroc, head in an 8 o'clock direction from the center of town. Keep walking near the broken walls, and a pop up window will appear (morroc 102, 143). Choose first option and you will be teleported to small room with a Warlock and 3 assistants.

2. Once inside, talk to any NPC. Your presence alerts the Assistants, who alert the Guild Master. She attempts to put a spell on you, but you resist it. She tells you about Warlocks, and you then request to become one.

3. Talk to the blond haired, blue dressed assistant, who asks you to gather a Shining Crystal and Giant Bradium Fragment.

4. Talk to the assistant wearing the white dress to leave the room. You will be teleported to Splendide.

5. Equip the two magical stone accessories you're given and hunt Naga and Bradium Golems to acquire the requested items. You must have these accessories equipped, or the items will not drop.

6. Return to Splendide and head to the northwest corner of the city. Enter the house there (splendide 119, 322) and talk to Yoop, who tells you to return to the Warlock Guild Master.

7. Walk down to the ground and go to the north west corner of the city (not on top) (splendide 140, 284) (or return to the wall in Morroc (morroc 102, 143)), and enter the Guild Master's room once again.

8. Talk to the blue haired assistant to the right. She will give you 4 types of Rainbow Rubies, 5 each (Each type of ruby mimics a Warlock AoE spell when used). You will be sent to the testing area at this point.
* Frost Misty, Chain Lightning, Earth Strain and Crimson Rock, from left to right.

9. Enter the chat in the testing area, if someone's ahead of you, the wait can be up to about 25 minutes. Make sure you bring a lot of potions, as this test hurts quite a bit!

10. After entering the Magical Room, 2 Nagas, 2 Bradium Golems, 2 Dark Pinguiculas, and 2 Aqua Elementals will spawn and must be killed using the Rainbow Rubies or your own skills. You have five minutes to complete this task.

Warning: There is NO delay on the first spawn. It will load before you do.

Tip: This fight isn't nearly as hard as it initially looks. SG as soon as you enter the room, and run to the corner. Chain lightning the aquas, killing them pretty much instantly. Throw 2 crimson rocks on the rest, then clean up with whatever you want. Once you're in the corner, a wall spell can help - ice if you can get in a good position for it, safety if you can't. Try to finish the fight in the corner, as this will make the second wave easier than the first. You *WILL* need healing potions, bring a lot of them.

As you slay the last monster of the first group, another 2 Nagas, 2 Bradium Golems, 2 Dark Pinguiculas, and 2 Aqua Elementals will spawn once more. If you're in the top left part of the room, you will only pull the Nagas. The counter resets, and you have five minutes to kill this group.

1. After all monsters have been slain, magical Porings will spawn. Kill all of them.
2. Finally, a Hollow Stone will spawn. You have 10 minutes to kill it.
3. After the stone has fallen to pieces, you are teleported back to the Guild Master's room.
4. Talk to the assistant to the right, then the Guild Master.
5. The Guild Master will change your job to Warlock, awarding you with a Green Apple Ring and a Magic Stone Hat [1].

Source: Iro Wiki
Image Source: IdRo official

Shadow Chaser Job Change Quest


Requirements:

Base Level: 99

Job Level: 50 for rogue, 60 for stalker

Quest Prerequisite: Turtle Island Entrance Quest

Reward Item: 1 Shadow Handicraft [1], 1 Green Apple Ring, 1 Makeover Brush, 1 Paint Brush

1. In morroc, speak to the Girl (morroc 156, 70) south a bit from the Kafra. She tells you about Shadow Chasers and tells you to go to the rogue guild.

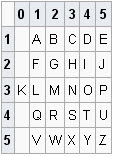
2. Inside the Rogue Guild (cmd_fild07 196, 117), proceed to the lower floor and speak to the Scary Man (in_rogue 379, 101) in the southeast room. He will describe an encryption method to you and tell you PAYON is encoded as 35 11 54 34 33

3. The code he gives you is [43 23 11 14 34 52 / 52 34 42 30 43 23 34 35 / 24 33 / 35 42 34 33 44 15 42 11], which translates to shadow workshop in prontera, so head to Prontera.

4. In south east Prontera (269, 110), enter the building and speak to the Manager, show him the deciphered code, and enter the text from the previous step.

5. When he asks, tell him you'll try and break in and steal the treasure. He will explain another cipher, you are given a keyword (which is a number) and a set of numbers, subtract the keyword from all numbers in the code, then use the prior lookup, then do a 1 to 1 correspondence with the alphabet.

* For example: [7 17 26 10 / 11 14 23 10 / 20 19 / 25 26 23 25 17 10 / 14 24 17 6 19 9 / 25 13 14 23 9 / 11 17 20 20 23] [Error: 5], subtract 5 from every number, then translate, the message you get is blue fire on turtle island third floor.

6. Proceed to Turtle Island 3. (you may need to do Turtle Island Entrance Quest)


7. In the northwest corner (tur_dun03 38,208), speak to the Blue Flame, and enter the deciphered code. When you try and touch the flame, it will mock you.

* Go kill 1 Shadow of Deception (Wind Ghost with high HP) somewhere on the map.

8. Return to the Blue Flame and try to pick up the marbles again. You will be warped to a small room.

9. Click on the shell and chose either option. The shell will give you "DECEIVE", a key, and the result of DECEIVE + the key. It will then prompt you for a result from "HONESTY".

10. After entering the correct code, you will receive a Key Of Deception.

11. Return to the Old Man in prontera and show him the key, he will tell you to head to Rachel and look for the gallery there.

12. Immedately southeast of the center of Rachel (180, 118), enter the building, go to the basement, and talk to the Manager (168, 65). Tell him you were sent by Graham.

13. The Manager, Paul, will give you another set of codes. [ R-E-N-N-N-D / L-N-N-W-W-N-D ] and a hint, these are directions to Ice Dungeon from Rachel and Lighthalzen (respectively).

14. Proceed to Ice Dungeon level 2.

15. In the northeast area, walk to the end of the offshoot and speak to the Red Flame (ice_dun02 206, 223)

* Go kill 1 Shadow of Illusion (Skogul with high HP) somewhere on the map.

16. Return to the Red Flame, talk to the box, after some discussion, it will hint you should use the cipher from step 2. Once you have the word translated, take the sum of all the digits.

* COLD = 13 34 31 14 = 1+3+3+4+3+1+1+4 = 20
* FOOT = 21 34 34 44 = 2+1+3+4+3+4+4+4 = 25
* SEED = 43 15 15 14 = 4+3+1+5+1+5+1+4 = 24

17. Once you recieve the Key Of Illusion, you will be sent back to Ice Dungeon 2. Return to the Manager in Rachel.

18. Show the Manager the key, he sends you to find Haled in Juno, if Haled isn't being cooperative, tell him I know what you did last summer!.

19. In the southeast corner of juno (275, 67), enter the building. In the basement, speak to the Manager (167, 129). Since he is being uncooperative, tell him you know what he did last summer.

20. Speak to him again, and he will give you a poem that hints towards Nifflheim.

21. At the center of the north edge of Nifflheim (231, 275), speak to the Red Flame.

* Go kill 1 Shadow of Pleasure (Succubus with high HP) somewhere on the map.

22. Return to the Red Flame. Inside, talk to the box, you will be given a series of numbers.

[20 21 18 14 / 1 14 4 / 19 8 1 11 5]

23. Convert them directly to letters and enter TURN AND SHAKE, when prompted "turn the house" and "roll it to upside down".

24. Once you recieve the Key Of Pleasure, return to Haled in juno.

25. Haled will send you to Vicente in Lighthalzen.

26. Enter the building in the very southwest corner of lighthalzen (41, 55), and speak to the Manager behind the desk.

27. After you show Vicente the keys, he will tell you to go to the first floor of thanatos tower.

28. On the north half of Thanatos Tower, walk to the center of the two spiraling staircases, and into the portal (tha_t01 149, 224).

29. Talk to the statue in the small room and place the keys to receive A Master's Brush.

30. Return to Vicente in Lighthalzen, select any option, he will ask you to go upstairs and speak with someone else.

31. Up the stairs, speak with Dumk (70, 66) and ask to change to a shadow chaser.

Source: IRo Wiki
Ranger Job Change Quest

Monday, November 29, 2010


Requirements:

Base Level: 99

Job Level: 50 for Hunter, 60 for Sniper

Quest Prerequisite: Access to Turtle Island

Reward Item: 1 Sniper Goggles, 1 Green Apple Ring, 1 Wolf Flute

1. Talk to the Survival Instructor located near the boat (Island Entrance) back to Alberta. He will give you further briefing about the job change and check whether you have attained base level 99.

2. He will then instruct you to remove all of your equipment and make your weight 0 (zenny is not included). You will be warped back to Alberta.

3. Return and talk to the instructor again. He will give you a survival test of reaching Test Instructor Teardrop located at the North-West tip of the island. He will provide you 1 Bow, 500 Arrows and 10 Novice Fly Wings.

* When you talk to Teardrop while doing Step 3, make sure you drop items left on your inventory (equipped Bow is excluded) or otherwise he will mark you cheating and warp you back to the starting point (beside the Survival Instructor). However, he will just tell you to remove excess items if you are already on Step 4.

4. When Test Instructor Teardrop is located, talk and choose "I came here for the test". He will then give you a simple mission of killing 1 Dragon Tail and return with 1 Wing of Dragon Fly in order to proceed.

* Your falcon will be a great help if you no more arrows in your inventory.

6. After passing the initial tests, he will then warp you to the test waiting area. When your turn is in, you will be warped to the first test area. He will provide you with 100 Arrows.

* He will also provide you 100 arrows when you fail the tests and start again.

The Test of Accuracy

1. In this mission, you will need to kill a monster from the poring-class family (consists of Poring, Marin, Poporing and Drops) around you. This is somewhat like the Hunter Job Change Test, the only difference is the monsters are poring-class. Instructions will be provided. You need to kill a monster named "Poring". The monsters will be summoned in different locations, types, and names every 5 seconds. It's good if you can find the right "Poring" quickly. Passing score is 15 out of 20.


How to determine Poring's location:

Always look at the North island (North direction, 12 o' clock).

* If the monster spawned there is called Poring, then just hit it.
* If it's called Podaegi, the Poring is on the northeast island. (↗)
* If it's Poporing, east. (→)
* If it's Poja, southeast. (↘)
* If it's Pororing, south. (↓)
* If it's Drops, southwest. (↙)
* If it's Hoing, west. (←)
* If it's Poing, northwest. (↖)

Trapping Ability Test

In this mission, the aim is to test your trapping skills by killing plant monsters that block your way. After you finish the first test, you will be warped to the 2nd test area, instructions will be broadcast. Stay where you are and wait for the time to start. NPCs and monsters that will appear on the test area indicates the time has started. You will be given 3 minutes to finish the test.

1. Talk to the representative near you. He will give you 10 Bombrings, 100 Novice Potions and 2k+ bulky report files which will make your weight go to 90%.


2. Using your bombrings, you need to eliminate the plant monsters which block your way through to the next representative. The plant monsters include Floras, Geographers, Nephentes, Drosera, Muscipulars, Mandragoras, and Parasites.

* Note: Bombrings follow you, attack you for 1 second and explode 3 seconds after you place them. The explosion encompasses a 5x5 cell area so don't get caught in it or you will die and have to repeat mission 1. You must consume all of the bombrings to proceed.

3. Reach the Test Supervisor Kowsyun at the end of the path, you need not talk to her, just walk near her and the dialogue will activate. After successfully killing some of the monsters and her giving the report files, she will warp you to the 3rd test area.


Using a Wolf Companion

1. Talk to the Supervisor and he will give you the instructions for the test.

2. He will provide you with 1 Job Change Flute to summon a mercenary Baby Desert Wolf.

3. Summon the mercenary and talk to the supervisor to begin the test.

4. You will be under the Stone Curse effect which prevents you from moving. You will need to control the mercenary to disarm 20 Egg Bombs that will appear randomly one by one on the map. Passing score is 10 out of 20.

5. After passing the test, you will redirected to the Ranger Master to change your job. He will check whether you have consumed all of skill points and ask you to remove your falcon. You will be awarded with 1 Sniper Goggles, 1 Green Apple Ring, and 1 Wolf Flute.


Source: IRo Wiki

Rune Knight Job Change Quest

Sunday, November 28, 2010


Requirements:

Base Level: 99

Job Level: 50 for knight, 60 for lord knight

Reward Items: 1 Rune Circlet[1], 1 Rune Plate[1], 1 Green Apple ring

1. Go to the bar south of the eastern Prontera Inn, and go south from the portal.

2. Speak with Splendid looking Knight (prt_in 164, 23).

3. Choose the option Sure, let's have a drink., then I'm ready to be a Rune Knight..

4. Travel to Glast Heim, go to the northwestern part of the map.

5. Speak with Rune Knight Jungberg (glast_01 43, 361), choose the option I came to be a Rune Knight.

6. Travel to level 2 of the Glast Heim Chivalry.

7. Speak to Rune Knight Staff (gl_knt02 144, 53), south of the middle of the map. You will be warped to the meeting area of Rune Knights.

8. Talk to Rune Knight Captain (81, 60) directly left of the point you enter the map.

9. Talk to Rune Knight Lunarea (89, 50) to the southeast, say you're ready to take the test.

10. Kill the Raydrics, Raydric Archers, and Khalitzburgs as they spawn. Every so often, the four tester Rune Knights will appear, and you can talk to them for buffs or a short stun. Survive this, and you will be returned to the Rune Knights.

11. Speak with Rune Knight Lunarea (89, 50) again.

12. Talk to Rune Knight Captain (81, 60) again.

13. Go to the west portion of the room, and talk to Rune Knight Reona.

14. Go to each book case, and read the three books Runes and Rune Knights, The Principles of Runes, and The Making and Use of Runes.

15. Talk to Rune Knight Reona again, she will state that she is going to send you to Sage Serpeone in Ash Vacuum.

16. Talk to Rune Knight Reona again, and say I'm prepared. You will be warped next to Sage Serpeone in Ash Vacuum.

17. Speak with Sage Serpeone, she will give you a quest to kill 10 dullahans, 10 disguises, 10 quves, and 10 heirozoists.

18. Travel to Niffleheim's first field map from Umbala, and kill the 40 monsters.

19. Return to Ash Vacuum, and speak with Sage Serpeone once more. Choose I've gathered enough energy.

20. Return to Rune Knight Staff (gl_knt02 144, 53), and enter the Rune Knight meeting area once more.

21. Go to the west, and speak with Rune Knight Reona

22. Click on the furnace to Rune Knight Reona's right, and match the runes with the shape that the furnace tells you. There will be a short delay as you proceed through the furnace chat before you can type in a Rune's name. You must type the rune's name in with the first letter capitalized.

* Ehwaz - Red Spiral.
* Osilia - Violet oblique line.
* Mannaz - Emerald diamond.
* Ansuz - Emerald round.
* Hagalaz - Skyblue star.
* Kano - Red diamond.
* Rhydo - Skyblue oblique line.
* Turisus - Yellow round.
* Dagaz - Emerald spiral.
* Sowilo - Skyblue fan.
* Laguz - Yellow diamond.
* Isia - Violet slant.
* Pertz - Silver spiral.
* Verkana - Gold star.
* Gebo - Yellow cone.
* Algiz - Emerald oblique line.
* Arwez - Gray diamond.
* Teiwaz - Gold round.
* Wunjo - Emerald star.
* Jera - Yellow round.
* Nosiege - Yellow fan-shape.
* Ingz - Violet diamond.
* Fehu - Silver round.
* Urj - Violet oblique line.
* NOTE: Isia in the book says 'violet spiral', but it is 'violent slant' with the furnace. Jera and Turisus have the same shape and color. Osilia and Urj have the same shape and color. There are two mentions of 'Ehwaz' in the book, with different shapes and colors. They second Ehwaz (gray diamond) is actually Arwez.

23. Speak with Rune Knight Reona after you have created 20 runes.

24. Go east, speak with Rune Knight Captain again.

25. Go to eastern part of the room, speak with Rune Knight Velpino

26. Go to the middle of the room, unequip all of your items other than your choice of weapon, or weapon and shield, and place them in storage. You cannot be over 400 weight.

27. Go east and speak with Rune Knight Velpino, and choose Enter the Final Test Field

28. Velpino will give you two types of runes, and 20 of each. The first set will cast Storm Blast, and the second set will cast Millenium Shield.

29. Once you have entered the test room, you will fight 1 Ogretooth , 1 Executioner , and 1 Mysteltainn one at a time. The next monster spawns as soon as the previous monster dies.

* NOTE: The runes given to you will be taken away once the test is completed. Do not be afraid to use all of the runes given to you.

30. Once you have defeated the three monsters, you will be warped back to the Rune Knight job change area. Speak to Velpino repeatedly until he directs you to return to the captain.
31. Speak with Captain Tigris, who will congratulate you and ask you to dismount from your Peco Peco. Do so and speak with him again, and he will change you to Rune Knight.
32. Speak with him again and you will be given 1 Green Apple Ring, 1 Rune Circlet [1], and 1 Rune Plate [1].

Source: Italian Ragnarok Community